Pages

Thursday, July 31, 2014

Magazine Series: DIY Beads

I love this last part of the DIY with Magazines series because it's simple and fun! Magazine beads are so easy to create and they make beautiful bracelets and necklaces. I was inspired for this project by the Student Rebuild: Water Challenge! Have fun making this super simple project great for any age! 

Materials:
Magazine, paint brush, Mod Podge (optional), scissors
The Mod Podge (and paintbrush) is completely optional because the beads need to be sealed with something, but you can buy any type of spray sealant or just any sealant that suits you! I chose Mod Podge because that's what I always work with. If you plan on making jewelry out of these beads, I suggest you also buy jewelry wire or string. ALSO. you will need a glue stick. Like I've said before, I am constantly crafting but I never seem to buy a glue stick so I just use Mod Podge. It's my best friend.

Step 1:
Tear a bunch of pages out! I created my bracelet with just one page, but my wrist is fairly small and it was merely a bracelet. If you're not sure how many beads you will need, I would recommend tearing out 2 pages. I tried to choose magazine pages that were a certain theme - browns and blacks. Try to choose pages that fit your color scheme so you can have your bracelet different shades of one color. 

Step 2:
Begin drawing long triangles like so on your page. I used a sharpie to draw them because it creates this nice edge on the beads. This step is completely optional as some people go ahead and free cut their strips into triangles. NOTE: The width of your triangles will determine how big or small your beads will be. If you want smaller beads, make small triangles and vice versa.

Step 3:
Cut out the triangle strips.
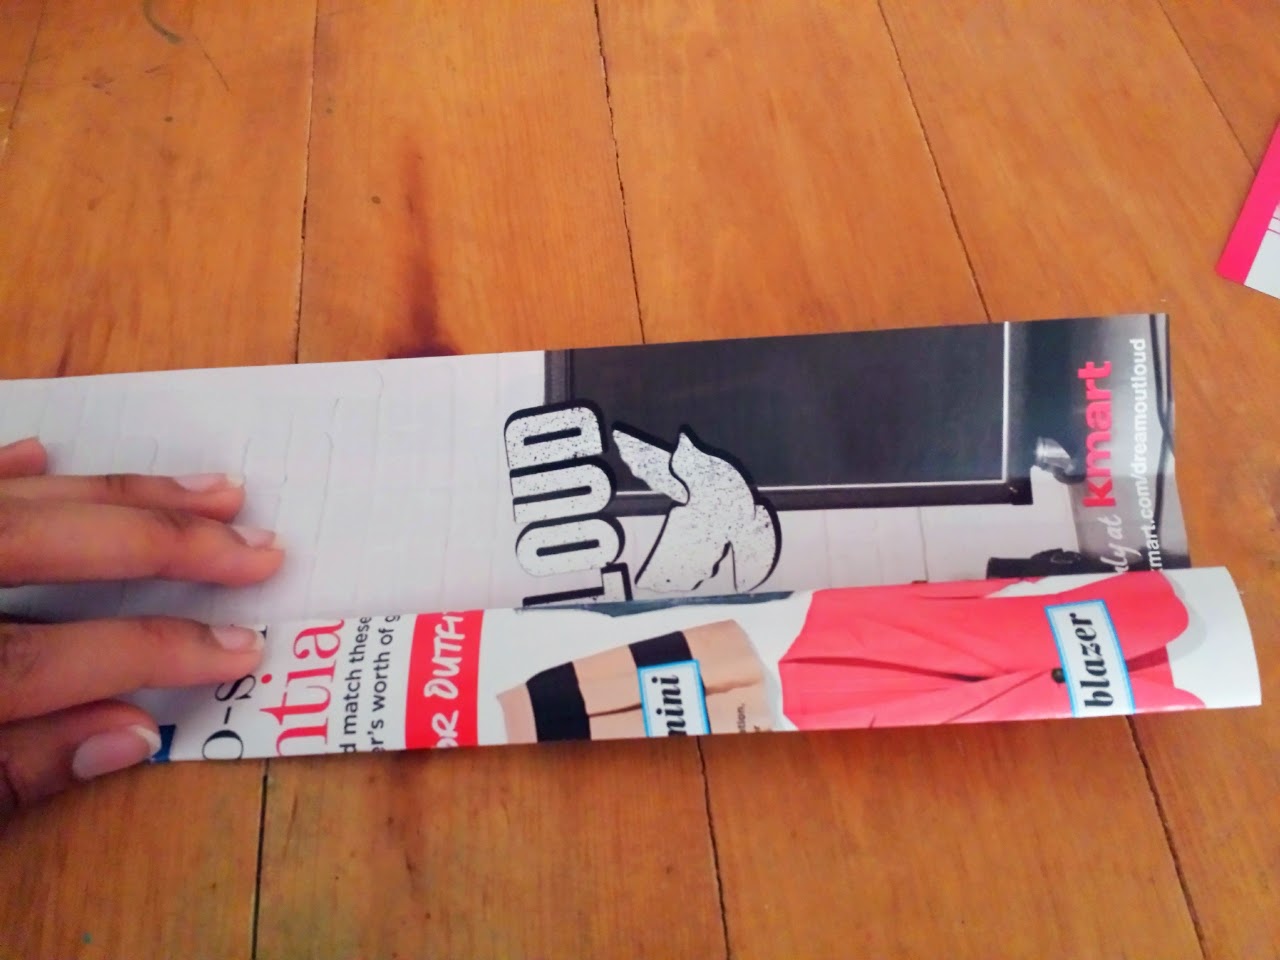
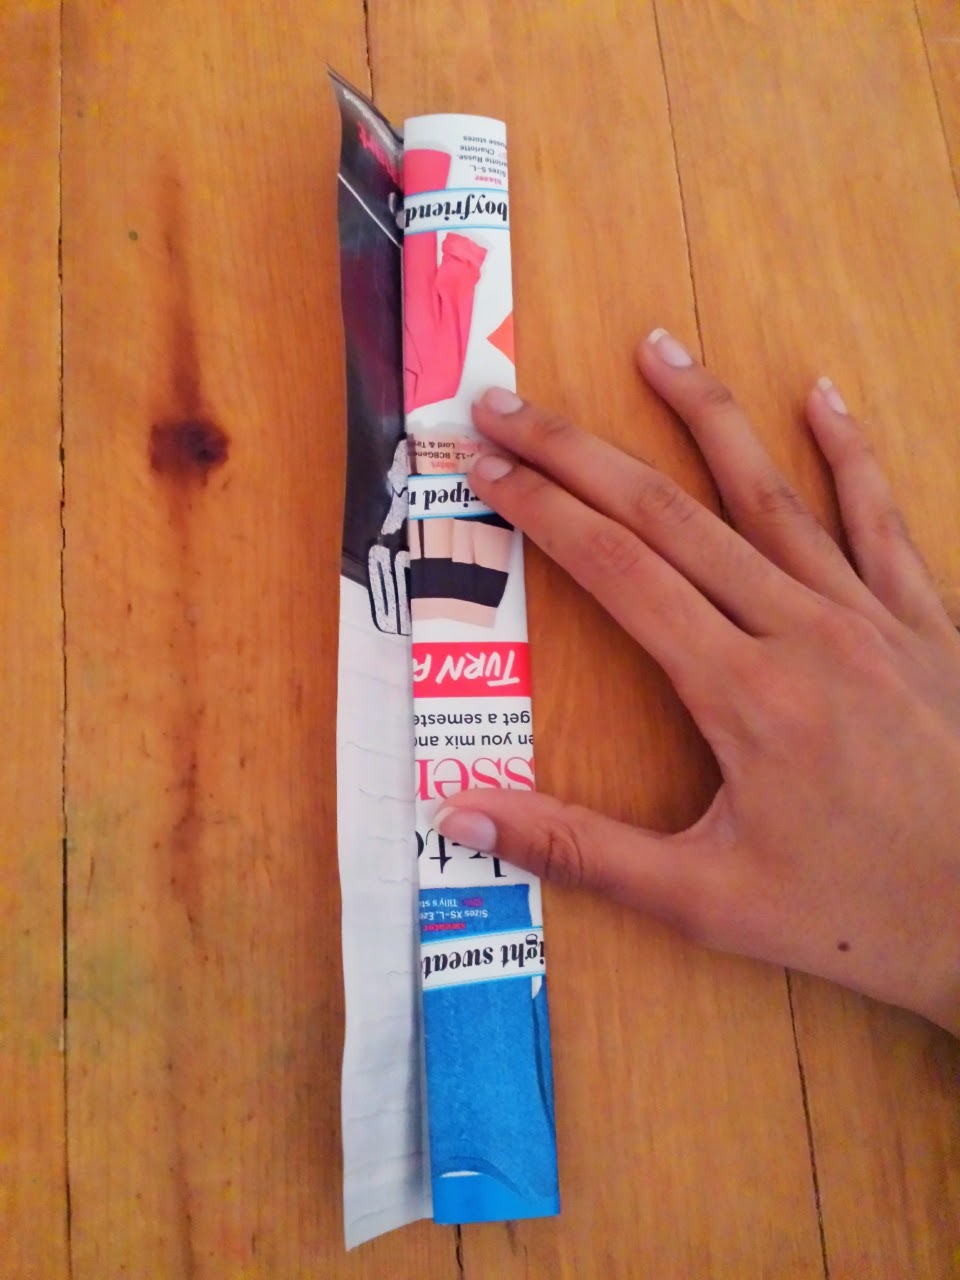
Step 4:
Roll up each strip starting with the wider side first. When you have about 2 inches of the strip left to roll, place glue on it and continue to roll until your bead is finished! Continue to roll and glue until you've finished all your strips. Roll and glue...roll and glue...

Once you have all of your beads completed, seal them! This will keep them from getting dirty, water logged, and unraveling!

Step 5:
After your beads are all finished drying, use jewelry wire to create a necklace or bracelet! I used stretchy cord because I was feeling lazy.

Finished!
Here's my finished bracelet! I really like how it turned out, especially with the Sharpie edging. You don't have to limit yourself to simply bracelets and necklaces! Use your creativity to create a keychain or maybe earrings. Don't be afraid to experiment with any of these projects.

~Misbah

Wednesday, July 30, 2014

July Favorites!


Can you believe July is over?! July is one of my least favorite months, because of how hot, humid, and sticky it gets here. However, it won't stop me from sharing with you a few things I compiled this month that are absolutely amazing! I've included not only baking items, but also beauty items. Enjoy!

B E A U T Y :

Renewing Argan Oil of Morocco Shampoo/Conditioner: There should be no question as to why I put this on my favorites list. This shampoo is the best hydrating shampoo I've ever tried. The oil works wonders for my curly, dry, and often frizzy hair. It not only smells wonderful, but also detangles your hair while removing dirt and fixing any damaged hair.

Kirkland's Daily Facial Wipes: As you may or may not know, I love Costco. It has everything for cheap prices and it's all wholesale. I found these wipes in the beauty section as the generic brand for the Neutrogena facial wipes they also sell. The first time I bought cleansing wipes from Costco was the Neutrogena brand, primarily because I always think the generic brand is sketchy. After I ran out of the Neutrogena wipes, I decided to figure out what was different between this one and Kirkland's (Costco's generic brand). Well first off, Kirkland's was in fact cheaper and had a greater quantity. Next Kirkland's contained mainly natural ingredients versus the artificial scary stuff in Neutrogena. I was sold and decided to try it out. These wipes do the same deal as Neutrogena! They wipe off all makeup, even waterproof, and even moisturize!

It's a 10 Miracle Leave-In: GIRL. This is heaven for your hair. I cannot express to you how amazing this leave-in spray is. All you do is spray it in your hair after you take a shower and oh my goodness, it really does do miracles. Your hair is completely tangle free and after your hair dries, it becomes so soft and lush. This is perfect for hair that is curly and frizzy!

etc! Golden Stud Set: Honestly, I've been looking high and low for a nice set of gold studs I could wear and at a local Rue21, I finally found them for $2!

B A K I N G:

Duncan Hines Simple Mornings Triple Chocolate Chunk Muffin Mix: I made a batch of these muffins for the eid breakfast we hold every year and these muffins are so delish! They are so soft and delectable which is very typical of Duncan Hines' mixes.

Nestle Toll House Cookie of the Year: German Chocolate Cookie Dough: I have so many good things to say about this cookie. First off, it's german chocolate and I buy anything that has to do with german chocolate. Secondly, the taste is out of this world. These cookies are the most tasty, crunchy, and overall delicious cookies I've ever tasted (I've tasted tons of cookies). They are so moist and chewy and just melt in your mouth! The one odd thing about these cookies is that they come in frozen dough cubes, and when you bake them, their cube-yness stays. Here's a picture:

Cubes, but still delicious.
~Misbah

Tuesday, July 29, 2014

Magazine Series: DIY Wrapping Paper

It's finally here! Part 2 of my magazine series is quick and super easy. Using magazine pages as an alternative to wrapping is great if you're looking for something that's cheap and cute! Magazine pages create a cute look to any present and it's very unique. Of course, you are limited to how large your gifts can be since magazines are not that huge, BUT that's what makes it even more adorable because all your gifts are tiny and tiny things are always appealing. 

What you will need:
Any magazine, the item you will be wrapping, scissors, and tape
I used an old Seventeen magazine and I admit, finding cute pages was a bit difficult since most of it was advertising. I ended up using the outfit collage pages since that was the best I could find. I do recommend using other magazines such as Real Simple or Good Housekeeping. 


Step 1:
Tear out a page and pick which side you want showing on the outside and which side will be on the inside. Place the present in the center of the page. I ended up changing my mind and used the pictured side as the outside instead of the inside. The present I'm using is this mini makeup kit I was gifted and I was just using it for the sake of this tutorial. I love this gift and will not be sharing hehe...

Step 2:
Fold both pages over each other to meet in the center. Then place a piece of tape, vertically, in the center.

Step 3:
This step is completely optional because it depends on the size of the gift. My "gift" was super small so I trimmed the edges a bit. 

Step 4:
Fold the sides inwards. Honestly, if you're new to gift wrapping, there's no easy way to explain this step in words. So here's my best attempt: you take the two ends on the sides and just push them inwards together! 

Step 5:

After folding in the sides, you should have something similar to a triangle shown in step 4. Fold the triangle inwards while folding the entire flap up. Perfect it by folding the triangle piece more. Then tape it down! Repeat on the other side. (If you're lost, it's okay. I can't explain it well, but follow the picture). 

Finished!
It should looking something like the above! If not, keep trying. When I first began gift wrapping, I had quite a bit of trouble and all of my folds were messy and uneven. If you want to get more creative with this project, I recommend using washi tape which is a japanese paper tape. I buy a roll of 10 tapes for about $1-$2 on eBay! I also suggest creating a bow out of solid-colored magazine paper and placing it in the corner just for a cute embellishment! 

~Misbah


Sunday, July 27, 2014

Eid Mubarak Dessert Toppers Tutorial

Yay! It's finally time for eid and all the last minute preparations are taking place, including this one! I decided to place these toppers on the the chocolate and savory muffins I baked for my family's eid breakfast. 

What you will need:
Scissors, toppers, tape, and toothpicks
I used Pages on my macbook to create .79" by .79" circles, added text and the star and crescent inside. Then I just copied and pasted 11 times and printed it out on a piece of construction paper. 

Step 1:
Cut out all the toppers! If you have a paper punch out, this step is so much easier. As for me, I didn't have one so this step was very time consuming.

Step 2:
Take a toothpick and tape it on the back of the topper. Make sure the toothpick is firmly pressed down and does not slide up and down.

Finished!
Repeat the above for however many toppers you have. Play around with the fonts and pictures for your topper and be creative! If you want a sturdier topper, I recommend using card stock.

The end product.


~Misbah

Sun-dried tomato-kalamata olive muffins

Today marked the end of Ramadan which means tomorrow is the day every Muslim has been waiting for - eid! Eid is the celebration at the end of Ramadan where we all pray, eat, and enjoy time with our family. My family will be having our annual breakfast together at my aunt's house tomorrow and I decided to make breakfast muffins! After searching and searching, I finally found a recipe in the newspaper for some savory muffins and I did switch it up a bit based on my own liking. These are super healthy and delicious! Enjoy! 

What you'll need:
- 1 cup all-purpose flour
- 2 teaspoons baking powder
- 1/4 teaspoon sea salt
- 4 large eggs
- 1/2 cup olive oil
- 1/2 cup whole milk
- 15 kalamata olives, pitted and roughly chopped
- 15 sun-dried tomatoes (in oil), drained and roughly chopped
- 10 basil leaves
- 6 ounces feta, crumbled
I bought the feta cheese and olives from Costco because Walmart was expensive. Yes, Walmart can be expensive.
Step 1: Preheat oven to 375 degrees. In medium bowl, whisk together the flour, baking powder, and salt.

My beautiful chopped veggies
Step 2: In another bowl, beat the eggs. Then add the olive oil and milk, and mix to combine. Add this mixture to the four mixture and stir until incorporated. Gently fold in the olives, sun-dried tomatoes, basil, and feta.

I used these adorable cupcake liners I was given.
Step 3: Spoon batter into lined and greased muffin tins, filling about 1/2 from the top. Bake for 10-15 minutes or until the muffins are firm to the touch.


These muffins turned out so yummy and scrumptious! I made and printed out the toppers which you can find here for the tutorial.

~Misbah

Magazine Series: DIY Magazine Bowl

My first part in the magazine series is, the classic magazine bowl! Hope you enjoy creating it!

Materials:
From left to right: large paintbrush, magazine, mod podge, and tape.
Step 1:
Pick out a bunch of pages from your magazine and rip them out! The more page you take out, the larger your bowl will be. Be careful to not rip into the page too much. I usually get a clean edge if I hold back the other pages and rip straight up.

Step 2: 
Begin folding your magazine pages inwards and lengthwise with a height of 1 inch.

Step 3:
After you have finished folding the pages, glue down the last flap to create a solid bar. Although I am a crafty person, I never seem to buy glue sticks so I just used mod podge.

Your magazine pages will look like the above.

Step 4:
Begin taping a few of the bars together. You need to tape at where to two meet and it's your choice if you want to wind the tape around the bar or place it only on one side.

Step 5:
Begin rolling inwards! If you put the tape only on one side, make sure the side with the tape is facing the table. Roll roll roll...

Step 6:
Continue to tape and roll until you have used up all of your bars. Tape the last remaining bar down wherever it ends. It should look something like the above picture.

Step 7:
Now slowly roll the top few bars up. You will begin to see your bowl take shape! It should look something like below. Although it might be bigger or smaller.

Step 8:
Coat the entire bowl with a sealant, I used Mod Podge, but you can use any other paper sealant. 

Finished! 
You can use your bowl for carrying any jewelry or some trinkets. I gave a few as gifts, filled with chocolate and other goodies! 

~Misbah

Saturday, July 26, 2014

DIY with Magazines Series!

Let's face it, we all have a little bit of clutter here and there in our homes. One the biggest messes I have are old and unwanted magazines. Typically, I like to donate them to our local library to put in a "Take As You'd Like" box. However, the magazines keep coming! I even cancelled my subscriptions 2 years ago, but for some reason they just keep coming. This led me to think, hmm what could I do with all these? I decided to experiment and found a few ways to creatively create with old magazines.  Over the next few days, I will be rolling out a three part "DIY with Magazines" series!

Each post will have a tutorial on how to make something cute, chic, easy, and totally affordable out of magazines!

Stick around by following this blog with either your blogger account or using the RSS!

~Misbah

Friday, July 25, 2014

Campfire S'mores Indoors

I've always wanted to roast marshmallows on a campfire but I never had the chance! I've never gone camping (and I don't intend to) and I don't have a fire pit in my backyard. Recently, I've been getting that s'mores itch again and I found a way to create the same campfire effect, using no fire at all!

Materials:
- Marshmallows
- Graham Crackers
- Chocolate (the thinner the pieces, the better this works)
- Toaster Oven
- Foil
- Skewer (optional)

Step 1: Take out a piece of foil big enough to fit however many s'mores you want to make. 

Step 2: Lay the foil down on a metal tray to place inside the toaster oven. Place the marshmallows on the foil, 1 inch apart from one another.

Step 3: Set your toaster on high (mine was 450 degrees) and on broil for about 4 minutes. Be sure to keep a watch so you don't burn them. Keep checking every minute and when they are golden brown at the top, take them out with your hands or skewer. 

Step 4: Place the toasted marshmallow on the graham cracker and chocolate. The heat from the marshmallow will melt the chocolate. 


Step 5: Now it's the fun part! Take the other graham cracker and squish! The marshmallow will ooze out just enough, melting the chocolate underneath into deliciousness. Serve and enjoy!


~Misbah

My Favorite Types of Coffee and Tea

I am truly a coffee addict. It's been hard trying to find the right brew for me - some don't wake me up and other cause me to fall asleep. I decided to compile a list of my favorite cups of coffee and tea!

C O F F E E : 

Nescafe Original: This is the one brand of coffee that really wakes me up (might be because it's extra forte??). Aside from the fact that it's loaded with caffeine, it tastes delicious! I usually sit down with blackberries and a cup of this coffee in the afternoon (I know, weird combo but it tastes so good). I'm very picky about where my coffee comes from as well. I only buy Nescafe from this indian store in a town nearby and it has to be imported from Uruguay. For some reason, the ones not from Uruguay taste different to me, although it's probably just a psychological thing. The indian store I buy this at sells this for $7.

Nescafe Taster's Choice Instant Coffee: This coffee is one that I drink on those super rainy and cold days. I wouldn't say that it gives me tons of energy, because it doesn't (plus the half life of coffee is 3 hours or so). I love any Nescafe coffee because in every cup, there's a unique taste that any other coffee I've tried does not have. This can be found at any grocery store for about $7 -$8.

Pacific Bold K-Cup from Kirklands: I love my Keurig. I love it so much that when it entered our home for the first time, I hugged it for a good minute. In the morning when I'm in a rush, trying not to be late to class, the Keurig is my BFF. I only use these K-Cups from Costco if I truly don't have time to sit down and relax with a cup of coffee in the morning. As for the taste, it's okay. It tastes just regular - nothing unique to it. You can get this at Coscto from about $30 - $40. 

T E A : 

Japanese Green Tea: I drink green tea every night. There are so many benefits to green tea such as: sleeping better and quicker, antioxidants, weight loss. It tastes amazing and this is a must for a start at being healthy. I would say I get this at my local asian store for maybe $4. 

Tapal: It's not very often when I drink Tapal, but when I do, it's very very very tasty and refreshing. In my home, we have tea time every day in the afternoon and when I feel very calm and it's been a great day, I drink this! I like Tapal because it's your classic tea and tastes great without milk (my family thinks it's necessary to pour milk into tea). I get this from a local indian store as well for about $5. 

~Misbah

Wednesday, July 23, 2014

Face Mask Review + Favorites

I absolutely love face masks because they not only nourish and refresh my skin, but they also give me some relaxation time. I use them at least twice a week, three times at the most to remove any dead skin cells and rejuvenate my skin. Every time I use a mask, my skin glows!

Claim: Soaks up unnecessary oils, without drying out your skin too much, and it exfoliates your skin to remove dead cells.

Perfect for: all skin types

Verdict: Yes it does! I have very dry skin so I need something that will suck out all the dirt after a long day without flaking my skin. When you first apply the mask, it begins to feel warm on your skin - a very soothing feeling. When you exfoliate, you can feel your skin already beginning to become refreshed! It does not dry my skin and it definitely does remove the dead skin because my face is so much more brighter and uplifting after I use this.

I do recommend you apply this over the sink because sometimes the product doesn't entirely stick to your face due to the grainy nature of it.

Claim: Takes out dirt and oils from pores. The infused avocado and oatmeal moisturizes skin for lasting skin softness.

Perfect for: normal to combination skin

Verdict: It's alright for my skin type. I do believe the mask rids your skin from dirt and oils, but not so much on the "lasting skin softness". Because my skin is dry, I expected that my skin would need additional moisturizing. However, my sister who has oily skin uses this and loves it! It keeps her skin fresh and moisturized! It also helps a lot with small breakouts!

Claim: Purges dirt and excess oil from face for a cleaner, refined surface. Also, the 8-antioxident blend of fruits guard against free radicals and environmental stress.

Perfect for: all skin types

Verdict: It's very different, but I kind of like it! This was my first peel-off mask I've ever used because I other peel-off's have been known to do quite a bit of damage to your skin. When you apply the product, it goes on clear and stays clear! It's the weirdest thing ever when you begin peeling it because it looks as if you're peeling off your skin. However, I feel that the infused fruits do calm my skin down after a long day and it does strip away dirt and oil - not too much though.

Claim: Delivers relief from inflammation caused by breakouts. Clay absorbs oil to minimize shine and large pores.

Perfect for: breakout prone and oily skin.

Verdict: YES. My skin is not breakout prone or oily, but I do use this mask whenever I have a couple of small breakouts here and there. Regarding the breakouts, this mask not only calms down the inflammation but it can also remove white heads! I do have large pores in my T-zone. I didn't really see a difference with my pores. My sister uses this for her oily skin and it seems to work fine with her!

Claim: Tones skin and diminishes the appearance of large pores and moisturizes for smoother, softer skin.

Perfect for: normal to dry skin.

Verdict: YES! What I love about this mask is that it does tone your skin. Sometimes, my skin can get irritated during the day and becomes a pinkish tint around my cheeks. After using this mask, the tint does go away and it does moisturize! Aside from all the great benefits, the mask smells EXACTLY like chocolate and strawberries which makes my mouth water.


Claim: Effective pore cleanser, tightens loose and sagging skin,  and relaxes tired facial muscles to soften lines and wrinkles. 

Perfect for: mature skin

Verdict: It's okay. This was one of my first facial masks ever and my mother and I would share this. I don't believe it relaxes tired facial muscles, but it does clean pores. My face was brighter after I used this mask! 


Claim: Absorbs excess oil and minimizes the appearance of pores. 

Perfect for: any skin type

Verdict: I LOVE. Not only is aroma of this mask refreshing, it does wonders for my skin. I use this at the end of the day on the hottest days of summer. After my skin has taken in all the extra oil and dirt, I leave this mask on. When I wash it off, my skin looks visibly cleaner. My pores seem to disappear too! 


You can probably tell which ones are my all time favorites, but if I were to pick three it would be the charcoal, strawberry, and mint julep masks. They work best for my skin and in my opinion, are the best facial masks to exist.

~Misbah