Pages

Showing posts with label DIY. Show all posts

Thursday, January 15, 2015

DIY: Coco Lip Scrub

Hello everyone! A couple of weeks ago, I finally decided to buy coconut oil and see what all the hype was about. Since then, I've fallen in love and have been finding tons of ways to use it. In my first DIY with coconut oil, I decided to make this super delicious lip scrub!

Ingredients:
- Coconut oil (you can always use olive oil or even vaseline)
- Coco Powder* (I used Hershey's Unsweetened Dark Chocolate)
- Vanilla*
- Sugar
- A small container for the scrub

*These are optional

Ingredients:

Step 1:
Mix the coconut oil and sugar together.

Okay, so for this step, you really just need to eyeball how much coconut oil you need. It depends on the size of your container. Also, for the sugar, the more sugar you put in it, the more coarse the mixture will become and the better it will exfoliate. If you want a lighter exfoliation, put less sugar. When mixing all your ingredients, I recommend that you not mix it too much or the sugar will end up dissolving. 

This is completely optional, but it makes the scrub taste good: I recommend putting in some essential oils or flavors such as vanilla. I also added a little color and flavor by adding Hershey's Dark Chocolate coco powder and it ended up becoming delicious! Just continue to experiment with the flavors and amounts.

Step 2:
Carefully scoop the mixture into your container and pat it down to avoid bubbles. Place it in the fridge for 2-3 minutes so set the mixture and then you are free to use it! You can store the mixture in a dry place - it does not have to be in the fridge all the time. 

To use scrub, simply dip your finger in the pot and scrub your lips! You can also use a toothbrush with the scrub to really exfoliate your lips and keep them soft! I recommend using the scrub once a day to keep your lips super soft and moisturized!

~Misbah

Tuesday, October 7, 2014

DIY: Upscaling with Magnets!

diy

Hello everyone, it's time for some DIY-ing so get your crafty glue and scissors out because this one is [hopefully] a fun one! So recently, the fridge has been looking a bit bland and I decide to spice it up with some pretty magnets. I have tons of those ugly business magnets that random businesses mail out and they are absolutely no use to me. Back when I was a little girl in elementary school, I bought my mother a porcelain plaque type thing at a school event. I gave it to my mother later that day - who loved it - but she didn't know where to place it. She and I both decided to turn it into a magnet. And that's where the creativity for this DIY was fished out from! Recently, however, the magnet I placed on the back of the plaque has been falling off so I created an improved version of this DIY! Enjoy~


Step 1:
Find some objects around the house that are small, not too heavy, and are flat at the back. Here, I'm using the plaque I bought, but you could also use stones or other sentimental objects.

See my reflection?
As you can see, the first time I made this plaque into a magnet, I used magnetic scraps from a magnetic checkers game (that I still have! haha). I was very creative in my youth. I scraped off the magnets and started with a clean slate.

Step 2:
Find a few business magnets that you do not need. You will be cutting these up, so make sure they aren't anything important! 

Place the magnets on the back of your object and trace out any parts that need to be cut. I cut out sections for the ribbon and I trimmed the edges a bit. Also, I did this part backwards. Make sure the magnet side is facing up. Luckily, the edges I needed to trim were all symmetrical so no worries! 

Step 3:
That is henna on my hand because I did this during Eid weekend! 
Use a very strong glue to glue down the magnets onto your object. I used Super Glue glue, but Hot Glue should also work. 

yay for weird lighting change
This is how mine turned out! Make sure you wait for the glue to dry before you place it on the fridge.

Finished!
I also found a few class marbles with flat backs, painted them, and cut out small circles to create cute little magnets! Also, these magnets are totally useful - they will hold papers up! 

~Misbah

Wednesday, August 6, 2014

DIY: Convert an Old Book to a Journal

While summer cleaning out my closet, I found a bunch of old daily calendars and address books (who even uses those?!) among other school supplies. Some of the daily calendars were super cute and I just couldn't throw them away! I decided to turn them into journals/art books! 

Materials:
Old book, large paint brush, white paint
Normally, you would buy this paint type of material called Gesso which artists usually use to convert old books into suitable canvases for sketching. Gesso does not come in small containers and I didn't need a gallon of the stuff so I used white paint instead! It works just as well :)

Procedure:
Take a bunch of white paint and slather it onto the pages of the book. Wait for it to dry, then add another coat. Repeat until the words/drawings on the page are almost gone. However, some people (me included) like the look of words in the background of sketches, so you can always stop after one or two coats. 

I had to use two coats on my pages to cover them faintly. Here is a comparison! 

 And I doodled on mine! As for the cover, I cut a piece of card stock with my name on it and taped it down on the "Address Book" print with washi tape! Get super creative with stickers, ribbons, construction paper and other cool supplies! Share your creative journals with me by sending them to my email: coffeeandkhajoor@gmail.com 

~Misbah


Monday, August 4, 2014

DIY Hexagonal Nut Bracelet

I would like to begin this post by apologizing for the incredibly weird lighting changes throughout the entire post. The sun was leaving me and I had to make up for it by using fluorescent bulbs (ugh).

Now that we've got that out of the way, I'd like to mention that this is such a creative little way of making jewelry! I absolutely love taking weird things and making them into something awesome. Before we begin the tutorial, I'm just going to mention that this DIY was actually a bit difficult for me and did take a bit of practice before I got the hang of it mainly because I'm not used to braiding things other than my hair. If you braid string and other things often, this may be super simple and if not, this may be challenging. Regardless, it's fun!

Materials:
For this super cool project, you will need about 18 hex nuts and twine! I bought the hex nuts at Home Depot and there were 6 in one pack for $1.89. The twine was from Walmart and I bought this twine a long time ago so I have no clue how much it is, but it's probably no more than $2. 

Step 1:
Cut three pieces of twine in lengths of 2 feet. Personally, I only had to use one foot because I was blessed with an awkwardly skinny body and my wrists are very boney. Then create a knot with a loop on one end of the twine bundle, pictured above.

Step 2:
Begin braiding the twine. I braided until 1 inch, however feel free to braid more depending on your wrist size.

Step 3:
This is where life became complicated. Feed a nut through the left or right side of the braid (whichever goes next in your braid), then cross over while holding the hex nut in place with your thumb at the base of the braid. Then feed a nut through the other side and cross over. Repeat with all the nuts. Always keep your thumb at the base, holding the nuts in place or else your bracelet will go all over the place. That happened to me and I had to start over many times. Do not be discouraged if you do not get this right away, it required quite a bit of practice for me!

Step 4:
After you are finished braiding all the hex nuts, continue braiding with a regular braid for the same length you began with on the bracelet. I braided for another 1 inch.

Step 5:
After you finish the regular braid, tie a tight knot to complete the braid. Measure out how much more twine you need for bracelet sizing. Then tie another knot to complete the sizing. Based on how large the loop you created in the first step, you may need to double or even triple knot. I recommend putting clear nail polish on all the knots created so that it will be secured.

Finished!
And here is my arm candy.

I hope you all enjoyed this tutorial and leave a comment telling me how it went for you!

~Misbah

Thursday, July 31, 2014

Magazine Series: DIY Beads

I love this last part of the DIY with Magazines series because it's simple and fun! Magazine beads are so easy to create and they make beautiful bracelets and necklaces. I was inspired for this project by the Student Rebuild: Water Challenge! Have fun making this super simple project great for any age! 

Materials:
Magazine, paint brush, Mod Podge (optional), scissors
The Mod Podge (and paintbrush) is completely optional because the beads need to be sealed with something, but you can buy any type of spray sealant or just any sealant that suits you! I chose Mod Podge because that's what I always work with. If you plan on making jewelry out of these beads, I suggest you also buy jewelry wire or string. ALSO. you will need a glue stick. Like I've said before, I am constantly crafting but I never seem to buy a glue stick so I just use Mod Podge. It's my best friend.

Step 1:
Tear a bunch of pages out! I created my bracelet with just one page, but my wrist is fairly small and it was merely a bracelet. If you're not sure how many beads you will need, I would recommend tearing out 2 pages. I tried to choose magazine pages that were a certain theme - browns and blacks. Try to choose pages that fit your color scheme so you can have your bracelet different shades of one color. 

Step 2:
Begin drawing long triangles like so on your page. I used a sharpie to draw them because it creates this nice edge on the beads. This step is completely optional as some people go ahead and free cut their strips into triangles. NOTE: The width of your triangles will determine how big or small your beads will be. If you want smaller beads, make small triangles and vice versa.

Step 3:
Cut out the triangle strips.

Step 4:
Roll up each strip starting with the wider side first. When you have about 2 inches of the strip left to roll, place glue on it and continue to roll until your bead is finished! Continue to roll and glue until you've finished all your strips. Roll and glue...roll and glue...

Once you have all of your beads completed, seal them! This will keep them from getting dirty, water logged, and unraveling!

Step 5:
After your beads are all finished drying, use jewelry wire to create a necklace or bracelet! I used stretchy cord because I was feeling lazy.

Finished!
Here's my finished bracelet! I really like how it turned out, especially with the Sharpie edging. You don't have to limit yourself to simply bracelets and necklaces! Use your creativity to create a keychain or maybe earrings. Don't be afraid to experiment with any of these projects.

~Misbah

Tuesday, July 29, 2014

Magazine Series: DIY Wrapping Paper

It's finally here! Part 2 of my magazine series is quick and super easy. Using magazine pages as an alternative to wrapping is great if you're looking for something that's cheap and cute! Magazine pages create a cute look to any present and it's very unique. Of course, you are limited to how large your gifts can be since magazines are not that huge, BUT that's what makes it even more adorable because all your gifts are tiny and tiny things are always appealing. 

What you will need:
Any magazine, the item you will be wrapping, scissors, and tape
I used an old Seventeen magazine and I admit, finding cute pages was a bit difficult since most of it was advertising. I ended up using the outfit collage pages since that was the best I could find. I do recommend using other magazines such as Real Simple or Good Housekeeping. 


Step 1:
Tear out a page and pick which side you want showing on the outside and which side will be on the inside. Place the present in the center of the page. I ended up changing my mind and used the pictured side as the outside instead of the inside. The present I'm using is this mini makeup kit I was gifted and I was just using it for the sake of this tutorial. I love this gift and will not be sharing hehe...

Step 2:
Fold both pages over each other to meet in the center. Then place a piece of tape, vertically, in the center.

Step 3:
This step is completely optional because it depends on the size of the gift. My "gift" was super small so I trimmed the edges a bit. 

Step 4:
Fold the sides inwards. Honestly, if you're new to gift wrapping, there's no easy way to explain this step in words. So here's my best attempt: you take the two ends on the sides and just push them inwards together! 

Step 5:

After folding in the sides, you should have something similar to a triangle shown in step 4. Fold the triangle inwards while folding the entire flap up. Perfect it by folding the triangle piece more. Then tape it down! Repeat on the other side. (If you're lost, it's okay. I can't explain it well, but follow the picture). 

Finished!
It should looking something like the above! If not, keep trying. When I first began gift wrapping, I had quite a bit of trouble and all of my folds were messy and uneven. If you want to get more creative with this project, I recommend using washi tape which is a japanese paper tape. I buy a roll of 10 tapes for about $1-$2 on eBay! I also suggest creating a bow out of solid-colored magazine paper and placing it in the corner just for a cute embellishment! 

~Misbah


Sunday, July 27, 2014

Eid Mubarak Dessert Toppers Tutorial

Yay! It's finally time for eid and all the last minute preparations are taking place, including this one! I decided to place these toppers on the the chocolate and savory muffins I baked for my family's eid breakfast. 

What you will need:
Scissors, toppers, tape, and toothpicks
I used Pages on my macbook to create .79" by .79" circles, added text and the star and crescent inside. Then I just copied and pasted 11 times and printed it out on a piece of construction paper. 

Step 1:
Cut out all the toppers! If you have a paper punch out, this step is so much easier. As for me, I didn't have one so this step was very time consuming.

Step 2:
Take a toothpick and tape it on the back of the topper. Make sure the toothpick is firmly pressed down and does not slide up and down.

Finished!
Repeat the above for however many toppers you have. Play around with the fonts and pictures for your topper and be creative! If you want a sturdier topper, I recommend using card stock.

The end product.


~Misbah

Magazine Series: DIY Magazine Bowl

My first part in the magazine series is, the classic magazine bowl! Hope you enjoy creating it!

Materials:
From left to right: large paintbrush, magazine, mod podge, and tape.
Step 1:
Pick out a bunch of pages from your magazine and rip them out! The more page you take out, the larger your bowl will be. Be careful to not rip into the page too much. I usually get a clean edge if I hold back the other pages and rip straight up.

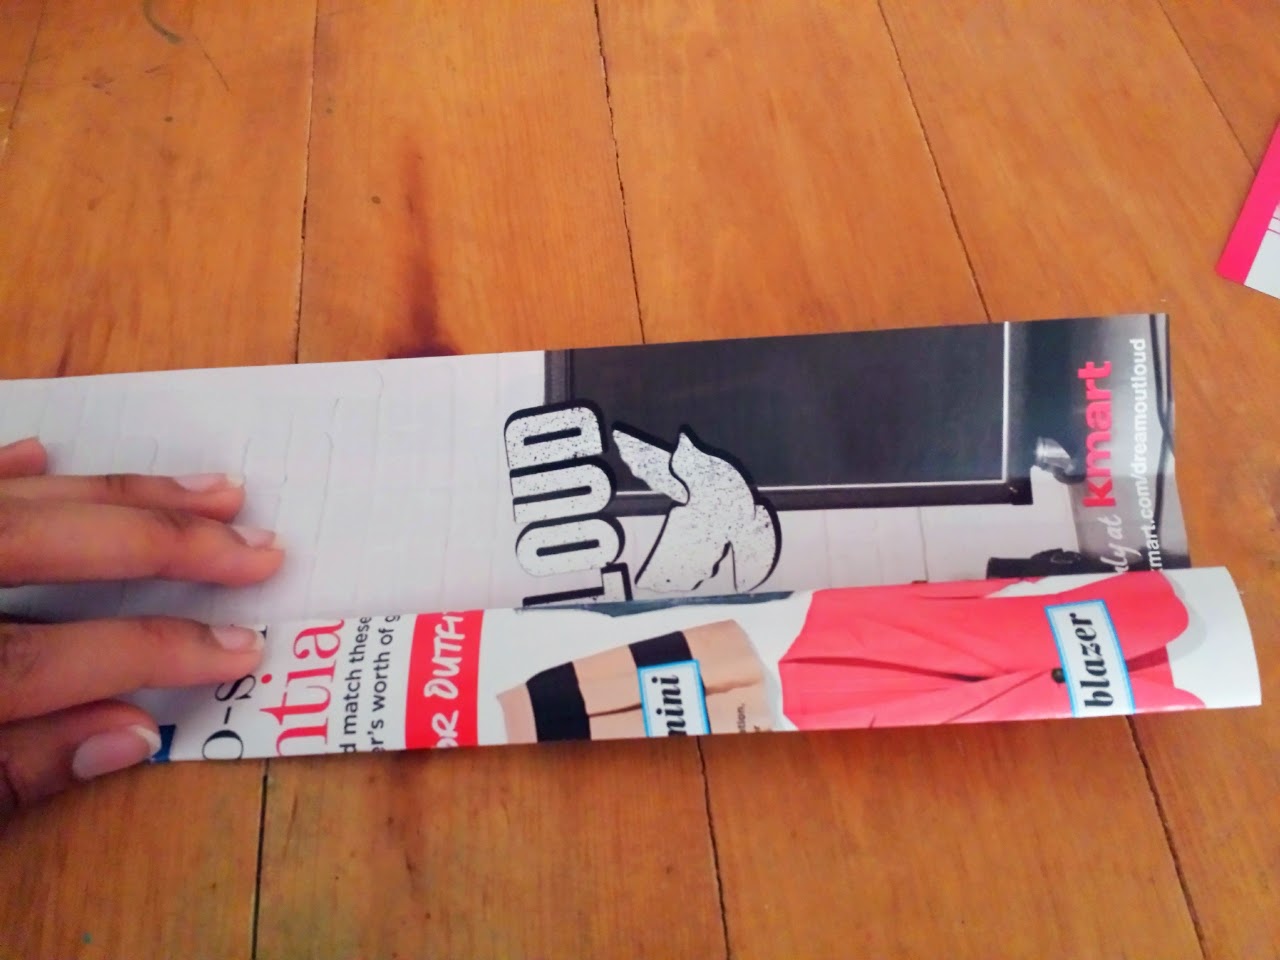
Step 2: 
Begin folding your magazine pages inwards and lengthwise with a height of 1 inch.

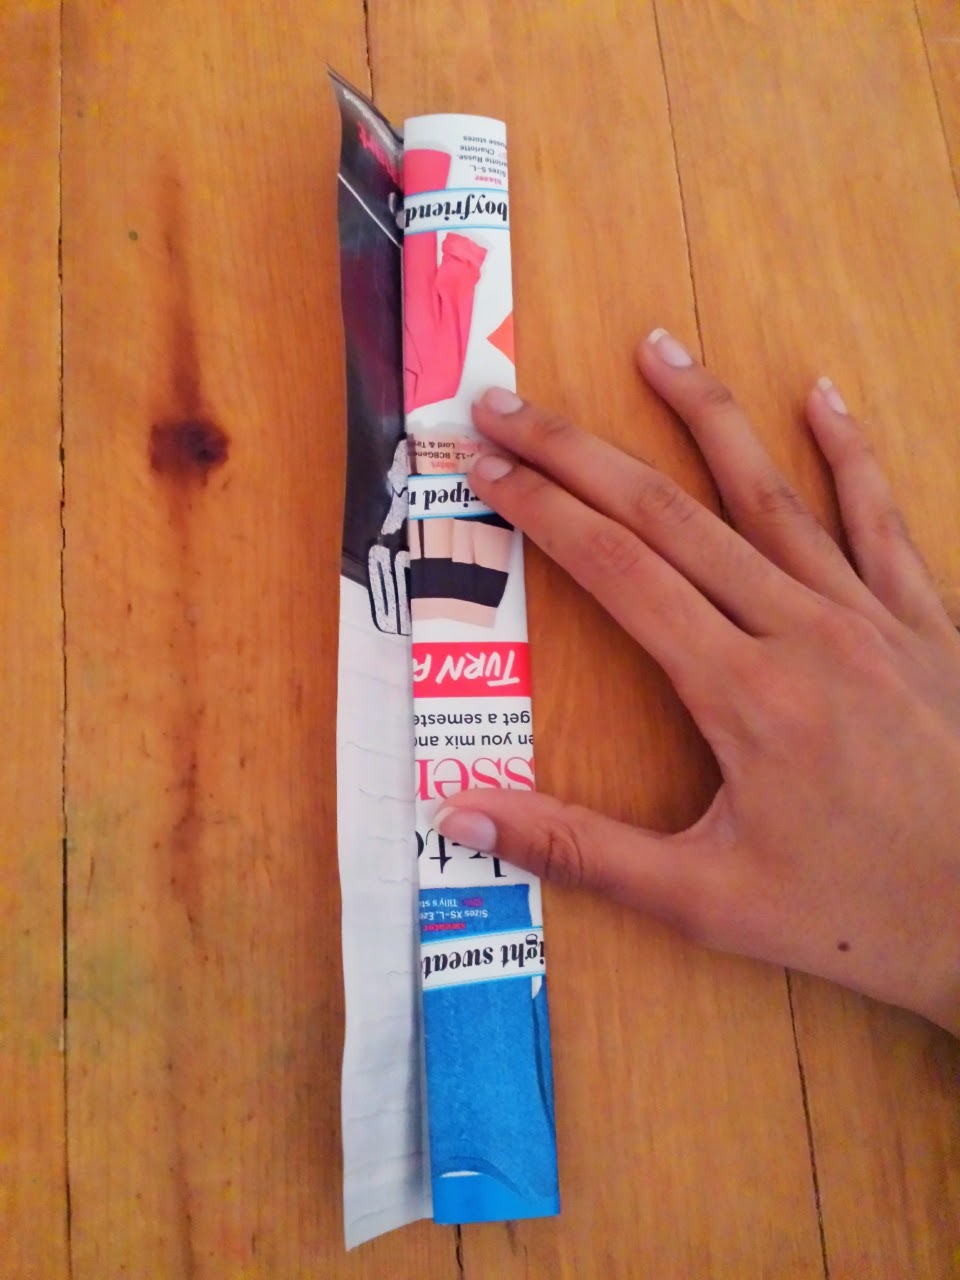
Step 3:
After you have finished folding the pages, glue down the last flap to create a solid bar. Although I am a crafty person, I never seem to buy glue sticks so I just used mod podge.

Your magazine pages will look like the above.

Step 4:
Begin taping a few of the bars together. You need to tape at where to two meet and it's your choice if you want to wind the tape around the bar or place it only on one side.

Step 5:
Begin rolling inwards! If you put the tape only on one side, make sure the side with the tape is facing the table. Roll roll roll...

Step 6:
Continue to tape and roll until you have used up all of your bars. Tape the last remaining bar down wherever it ends. It should look something like the above picture.

Step 7:
Now slowly roll the top few bars up. You will begin to see your bowl take shape! It should look something like below. Although it might be bigger or smaller.

Step 8:
Coat the entire bowl with a sealant, I used Mod Podge, but you can use any other paper sealant. 

Finished! 
You can use your bowl for carrying any jewelry or some trinkets. I gave a few as gifts, filled with chocolate and other goodies! 

~Misbah